Once you know the basics of Phishing web Page ,come to this post.
Requirements:
-
Wamp server
-
Install WinRar
Ok friends, there’s one drawback in our traditional Phishing web
page method. You know what is it? You are right, the url of our phishing
web page. It may look like the real one,but it is not.
For eg: we may create the Phishing web page withwww.gmails.com but it’s not at all same as www.gmail.comProbably, the experienced internet users will notice the URL of web Page. So they won’t fall in our Fishnet.
What we are going to do now?
Why should not we make the phishing web page’s URL looks exactly
same as the real Domain Name? You may ask “is it possible?”. My answer
is yes, you can. It sounds good? go ahead.
How we are going to implement?
We are going to send an email with an executable to victim.
If the victim double click the executable file, then you are done.
Now whenever the victim enter the real domain name (likewww.facebook.com) ,he will be in our phishing web page.
Don’t worry the domain name is original URL(like http://www.facebook.com)
Got surprised….!!!! You may ask how this is done,go ahead.How it is done?
Executable file will change the Host file of Victim system.
What is host file?
The host file contains Domain Name and IP address associated with them. Your host file will be in this path:
C:\Windows\System32\drivers\etc\
Whenever we enter the Domain name or URL (for
eg:www.webaddress.com), a query will be send to the DNS (Domain Name
server). This DNS connect to the IP address which is associated with
the Domain Name. But before this to be done, thehost file in our
system will check for the IP address associated with the Domain Name.
Suppose we make an entry with Domain Nameand IP address of our phishing
web page(for eg:www.webaddress.com wiht our ip 123.23.X.X),then there’s
no query will be send to the DNS.
It will automatically connect to the IP address associated with
theDomain Name. This will fruitful for us to mask the PHISHING web
page’s URL with Original Domain Name.
Now Let’s divide into the Implementation:
If you are hosting some other hosting site, probably you won’t get the unique IP address for your Phishing Web Page. You can have the IP Address of the hosting only. So if you try to use that IP address, the victim will not bring to your Phishing web page , they will bring to the hosting address.So what you can do overcome this problem? You need to set up your own Webserver in home. Using Webserver softwares you can set up your own Hosting service.
How To set up Your own server?
Download the Web server software’s like WAMP, XAMP. My suggestion is WAMP. Because it is my favorite one. It is easy to use.
Downlad the wamp serverInstall the WAMP server. After installation completed, Go to this folder path:
C:\Wamp\WWW
And paste your phishing web page here.
Start the Wamp Server.(Start->windows->All Programs->Wamp Server->start wamp server)
you can see the half circle icon(wamp server icon) in system tray(i mean near to the time). Click the icon and select the start all services.Now type your ip address in address bar of the web browser and hit enter. If you don’t know your ip address ,visitwww.whatismyip.com
Now you can see your Phishing web page in your Browser.
Modifying the Host file:Copy the Host file from this path “C:\WINDOWS\system32\drivers\etc” to desktop. Right click on the host file and open with Notepad.
You can see the localhost entry there.Below that type as :
your_ip domain_name
For eg:
123.xx.xx.xx www.gmail.com
.
Save the File.
Compress the Host File:
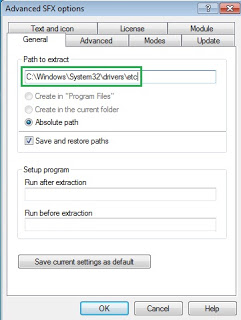
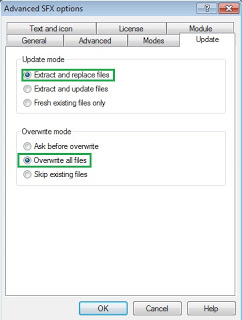
Compress hosts file such that when victim opens it, it automatically gets copied to default
location C:\Windows\system32\drivers\etc and victim’s hosts file get replaced by our modified hosts file.
Right click on the Hosts file and select the Add to archive option. Now follow the steps which is shown in picture:
Now send the zipped file to victim. If he extract the zip file, then the hosts file will be replaced.
You are done. Now whenever he try to visit the genuine or original website, the phishing webpage only will be shown.
Some Disadvantages of this Hack:
-
If your IP address is dynamically changed ,then it is hard to implement it
-
If your victim is advanced user,he may notice the certificates of site which is shown by browser.


No comments:
Post a Comment