Live Ddos View

Live DDoS Attack Map | Apakau

Live DDoS Attack Map

This map is the fruit of collaboration between Google Ideas and Arbor Networks in an effort to raise awareness about distributed denial of service attacks in the world everyday.

Exploring the Data

The Digital Attack Map displays global DDoS activity on any given day. Attacks are displayed as dotted lines, scaled to size, and placed according to the source and destination countries of the attack traffic when known. Some features include:

  • Use the histogram at the bottom of the map to explore historical data.
  • Select a country to view DDoS activity to or from that country.
  • Use the color option to view attacks by class, duration, or source/destination port.
  • Use the news section to find online reports of attack activity from a specified time.
  • View the gallery to explore some examples of days with notable DDoS attacks.

Sign Up

Wednesday, February 4, 2015

Remove Autorun Virus from Pendrive and Computer using CMD

Autorun virus in Pendrive and Computer in those days are common things. When you plug your pendrive in Computer ,your computer is infected by autorun viruses. So how can you get rid of these viruses without using and paid antivirus.

Autorun virus removal in USB Pen Drives.

Here i give you a trick,with this trick you can remove all autorun virus from Pendrive. So follow the given steps -

How to remove autorun virus using cmd prompt ?


  • Press ( Windowkey +R) type cmd and press enter.

  • In Cmd type cd\ for changing directory.
  • Type in attrib -h -r -s autorun.inf ), without brackets and press Enter.
  • Type del autorun.inf ), without brackets and press Enter.
  • Follow this for all other drives. 


How to remove Shortcut virus from pendrive using cmd  ?


Shortcut make all your files shortcut in your pendrive. This is very annoying thing. If this virus enter your system ,your system is house of shortcuts. Mainly these virus found in pendrive .

 Just follow the below given steps to remove shortcut virus from pen drive.
  • Press ( Windowkey +R) type cmd and press enter.
  • Go to your pen drive directory.(if your pendrive disk name G then type G: and press enter)
  • Type this command: del *.lnk and press Enter.
  • Type attrib -h -r -s /s /d e:\*.*
  • And then press a  Enter.

How To Identify a Website/blog is on WordPress or not

How To Identify a Website/blog is on WordPress or not


  • First visit isitwp.com Website.check website is wordpress or not
  • Next thing is enter the domain name.
  • Click on find out. 
  • Now the message come this website is wordpress or not.

[TUT] How to Start Your Own Stresser/Booter (NOOB FRIENDLY) [Step By Step]

[Image: jIkTP3jGqIFME.png]

This tutorial will teach you how to maintain and create your own stresser, otherwise known as a booter. I have another tutorial on this. This tutorial is updated, more detailed, and gives an even better source. Please leave feedback, or questions, or even if you think I should add something in, please don't hesitate.

[Image: jW2mxjejiQxR6.png]

1. Introduction (Sector 1)
2. Uploading Your Files (Sector 1)
3. Uploading and Configuring MySQL Databases (Sector 1)
4. Mandatory File Edits (Sector 1)
5. Configuring PhpMyAdmin (Sector 2)
6. Accounts (Sector 3)
7. Creating An Account (Sector 3)
8. Activating Your Account and Making Yourself an Administrator (Sector 3
9. Accessing the Administrator Control Panel (Sector 3)
10. Sells/APi's (Sector 4)


[Image: j3Kqy0dUN0MNg.png]

So. You may be this far, but you may not know what a stresser, or "booter" even is. A stresser uses shells or api's to attack a certain location. These will send a certain amount of packets to the desired location, and if it sends enough packets it will force the server, or connection to flood, and simply crash. When a router, or connection/network crashes, that server cannot handle the amount of incoming packets.

[Image: jLVyWBEP1gdZK.png]

JeeJee Power v1.0 Source:

http://www.mediafire.com/?pbe1debx2hd8qg7

Shell Checker:

http://www.mediafire.com/?du52p5rlfdm5ura

Introduction (Sector 1):

Note: Please note I have spoilered image to have bandwidth. Click view spoiler to view tutorial related images! Thank you. -Natha.

Welcome to Sector One of this tutorial. In this stage I will be teaching you the following:

  • How to setup your hosting.
  • How to upload and configure your stresser.

Uploading Your Files (Sector 1):

1. For tutorial purposes I'm simply going to use a hosting website called http://000webhosting.com/ I would not advise using this website, you will not be able to send attacks. They have fsock disabled. As I said, this site is just for tutorial purposes. I would advise getting cheap hosting here at HackForums in the hosting marketplace.

Once you have your hosting, you will want to upload your files that you originally downloaded above. ONLY upload the files within the source folder included in the download. There is no point uploading the banner .PSD etc.

To upload your files download filezilla at http://www.filezilla-project.org/ or use the file manager in your hosting's cPanel.

Uploading and Configuring MySQL Databases (Sector 1):

Once you have your files uploaded. Go into your cPanel and create a MySQL database.

The majority of hosts, if not all will all come with MySQL installed.

Create your database. Remember the information used. 

After your database has been created, we now want to edit three files. The three files are below:

Mandatory File Edits (Sector 1):

We need to edit the files so our stresser can connect to the MySQL Database.

  • dbc.php
  • shellcounter.php
  • includes/ezSQL.php ( line 44, 71 and 101 )

dbc.php:

This is self explanatory. At the top you will see the lines below. The lines below explain exactly what to edit. Edit the information within the ' 's. Like I have done below.

PHP Code:
define ("DB_HOST", "mysql9.000webhost.com"); // set database host
define ("DB_USER", "a9162705_xx"); // set database user
define ("DB_PASS","Example1"); // set database password
define ("DB_NAME","a9162705_xx"); // set database name 

Line 1: This is your database host.
Line 2: This is your database username.
Line 3: This is your database password.
Line 4: This is your database name.

If you haven't caught on by now. You need to input all of your MySQL information into those fields. 

shellcounter.php:

The top of shellcounter.php will look like this:

PHP Code:
/* START OF CONFIGURATION SECTION */
$mysql_username = 'a9162705_xx';    // MySQL User Name
$mysql_password = 'Example1';  // MySQL Password
$mysql_hostname = 'mysql9.000webhost.com';    // MySQL Host Name
$mysql_hostport = 3306;  // MySQL Host Port
$mysql_database = 'a9162705_xx';    // MySQL Database
$mysql_shelltbl = 'shellpool';    // MySQL Table Name (will be created if it does not exist)
$mysql_stengine = 'MyISAM';    // Preferred MySQL Storage Engine (MyISAM, MRG_MyISAM or InnoDB) 

You will only need to edit the following with your MySQL Database Information:

PHP Code:
$mysql_username = 'a9162705_xx';    // MySQL User Name
mysql_password = 'Example1';  // MySQL Password
$mysql_hostname = 'mysql9.000webhost.com';    // MySQL Host Name
$mysql_database = 'a9162705_xx';    // MySQL Database 

LEAVE everything else as is. Ports for example, leave them. They're fine.

ezSQL.php:

I would recommend getting Notepad++. Download it at, http://notepad-plus-plus.org/ to navigate line numbers easier. Read above for the lines that need to be edited.

Line 44:

Edit the obvious fields. I've inputted my database information.

PHP Code:
function ezSQL_mysql($dbuser='a9162705_xx', $dbpassword='Example1', $dbname='a9162705_xx', $dbhost='mysql9.000webhost.com') 

Line 71:

Once again, edit the obvious fields. Look at the $values. It explains it clearly. $dbuser is the database username, and so on. Common sense.

PHP Code:
        function connect($dbuser='a9162705_xx', $dbpassword='Example1', $dbhost='mysql9.000webhost.com') 

Line 101:

Finally for a short one, line 101, just the database name.

PHP Code:
        function select($dbname='a9162705_xx') 

Configuring PhpMyAdmin (Sector 2):

Welcome to Sector 2 of this tutorial. This will teach you how to configure your PhpMyAdmin with your stresser source. Please don't over think this. It may seem overwhelming, but it's incredibly simple.

Your cPanel should have PhpMyAdmin. 

Locate the import button located at the top of PhpMyAdmin:

Spoiler (Click to Hide)
[Image: ibnSppRtGxLUlX.png]

Once you're in the import menu. Upload the provided .SQL file in the JeeJee Power folder. Like below:

Spoiler (Click to Hide)
[Image: ibzIoagF1p74n6.png]

Then after click "Go" like provided below.

Spoiler (Click to Hide)
[Image: iRWQMzyV6Y1I9.png]

Then you should get a success message, and the databases should appear on the side.

Accounts (Sector 3):

Welcome to Sector 3 of this tutorial! In this sector we will be learning how to register our account, activate it, and then proceed to give our self administrator rights, and access to the AdminCP.

You will want to locate YOURDOMAIN.com/login.php (Of course replace YOURDOMAIN with your actual domain, as this is just an example).

Creating An Account (Sector 3):

You will now be at the login page like below. (IF you get a MySQL error, you have input your MySQL details to the edited pages incorrectly).

Spoiler (Click to Hide)
[Image: ifPxE7PWOumN4.png]

Click the register button, and register your account.

Spoiler (Click to Hide)
[Image: i7W9kRZto6bPu.png]

Now your account is registered! Congratulations.

We're not done yet!

Spoiler (Click to Hide)
[Image: iCub0oXuOHsKI.png]

Activating Your Account and Making Yourself an Administrator (Sector 3):

Now go back to PhpMyAdmin.

Click the table called 'Users' on the side and then click Browse button at the top, just like when you clicked import. 

Spoiler (Click to Hide)
[Image: itDujnSFYjH1c.png]

You should see your own profile:

Spoiler (Click to View)

You want to click edit, which is of course the little pencil button. 

You need to change the values. Change the user_level value to 5. This will make an you administrator. Then you want to change the approved value from 0 to 1 to approve your account. 

Congratulations, your account is now active, and you're an administrator!

Spoiler (Click to Hide)
[Image: iYeDbww90WtHe.png]

Accessing the Administrator Control Panel (Sector 3):

To go to the administrator's control panel go to YOURDOMAIN.com/admin.php (Obviously replace YOURDOMAIN.com with your own once again).

From here you can change your booters name, add shells, post new bulletins, read logs, create users, active users and more!

Deadly Virus Can Destroy/Format Your Pc


Save as .bat and send to your target
Note : Very Harmfull


Deadly Virus Can Format Your Pc by Yoshikawa Seitaro


Yoshikawa Seitaro

Tuesday, February 3, 2015

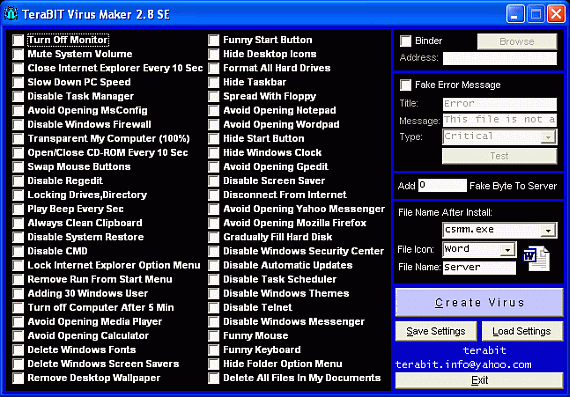
Terabit Virus of Maker 3.1


What is Computer Virus?
A computer virus is a stealth program that is injected into your computer without your knowledge and runs against your wishes and frustrate you some time. Viruses can also replicate themselves. All computer viruses are man-made.A virus can replicates itself by being copied or initiating its copying to another program, computer boot sector or files,etc.Some viruses are also used to get useful information of users like credit card details,email-id passwords,etc.
In this post i am sharing "Deadlines Virus Maker" with you all.This software will help you out to make some computer viruses easily.


Terabit Virus of Maker 3.1 

is software maker of virus using GUI [ Appearance of User which is is easy to be understood and Software ini, Guys use. With can become a maker of virus which is horrifying. With a few/little touch / computer choice, a can go to pieces 

Oh this application iya, Because use Ianguage of inggris,saya suggest great friend use Google Translate to translating it otherwise understanding .Who make a virus with TVM?HEM. I will not study it because just great friend easy to its... Pleace saking try by x self.

Password Cracking


John The Ripper by Kitamura Yoshimune

L0p Crack by Kitamura

0phCrack by Kitamura

Cain and Abel by Kitamura

How to use Cain & Abel Tut Here by Kitamura

Updated with 14 million Password to crack ;) by KitaMura